Dynamic Range Test – Canon 5D Mk IV

 One problem that photographers frequently face when trying to a capture an image of the scene before them is that the brightness range frequently exceeds the dynamic range of their camera to capture the total range of brightness values. While there are various ways to deal with this problem such as exposure bracketing and later blending together using HDR (high dynamic range) software, or choosing to sacrifice the shadows in order to preserve the highlights; cameras capable of wide dynamic range are obviously desirable.

To that end, DxOMark has measured the dynamic range of many cameras based on signal-to-noise ratio measurements. Their result for the Canon 5D Mk IV at ISO 100 is 13.6 stops. However, some articles have recently claimed that the dynamic range of DSLR cameras these days is closer to 8 stops. Accordingly, I decided to conduct my own test.

A Kodak gray card filling the whole frame was photographed using a Canon 5D Mk IV camera set at ISO 100 mounting a Canon EF 24 – 70 mm F2 .8L II USM lens set the F2 .8. Once focus was obtained the autofocus was turned off and the exposure was adjusted until the value was centered in the metering scale. Then the exposure was increased 5 stops by adjusting the shutter speed, and a RAW photo was recorded. As the exposure was progressively decreased in one stop increments, photos were recorded until -5 stops was achieved.

The photographs were brought into Adobe Bridge CC 2018 set to ProPhoto RGB; 16 bit, and opened without adjustment in Adobe Photoshop CC 2018 for measurement. The L* values at the center of each photograph were measured using the Eyedropper Tool set to a 101 x 101 pixel average. The data were then entered into an Excel spreadsheet from which a graph was constructed showing L* (Luminance) versus exposure stops, see below:

Dynamic Range Test Results Plot


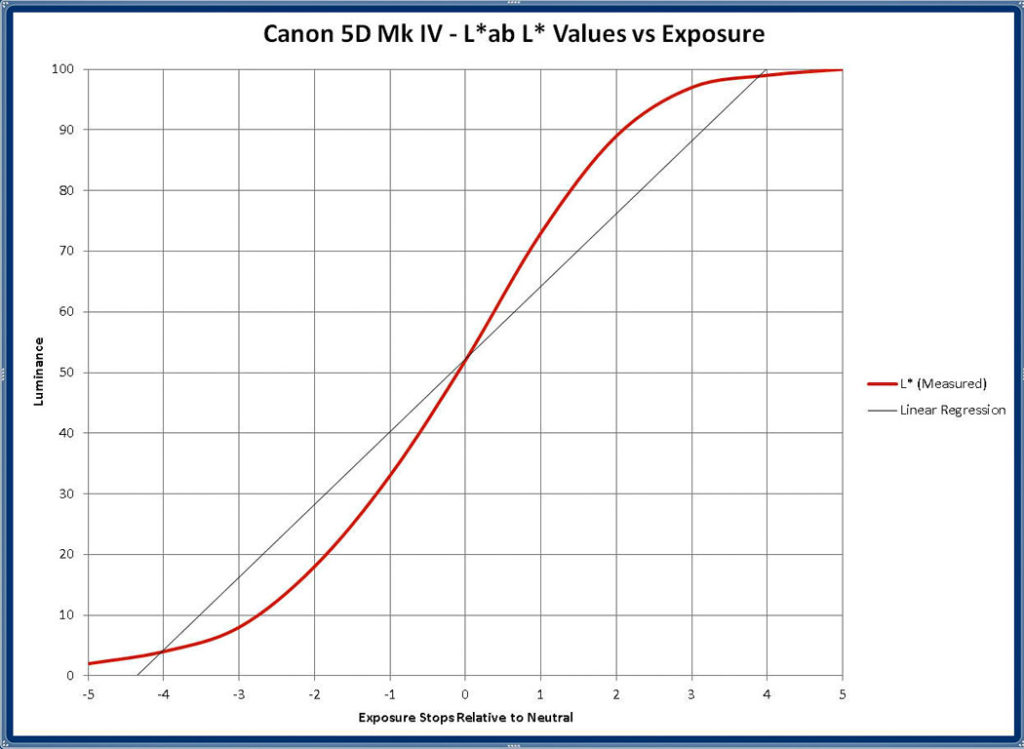
As can be seen, the L* curve is not linear as exemplified by the black linear regression line that accompanies it. So what does this all mean? First, it shows heightened contrast for the first 6 stops surrounding zero. After that, the contrast becomes compressed at both ends of the scale. So from this, it looks as though the practical usable dynamic range lies around +/- 4 stops. After that things rapidly approach pure white at the high end of the range, while at the low end of the range we approach pure black.

So we confirm the 8 stop usable dynamic range findings of others. But what does this really all mean for our photographs? That is a question that we answer in Exposure Recovery – How Much is Possible?


Posted in Blog, Photo Topics, Tech Talk | Tagged , , , , | Comments Off on Dynamic Range Test – Canon 5D Mk IV

Neutral Density Filter Test

When I decided to purchase neutral density filters, I first looked at variable neutral density filters. However reviews on the web indicated that they are prone to color issues as well as various distortions under certain circumstances. Therefore I decided to acquire fixed neutral density filters instead. Reviewed here are fixed 3-stop and 6-stop X4 82 mm ND filters that I bought which are manufactured by Breakthrough Photography. Their claim to fame is the use of Schott glass that is multicoated on each side with 16 layers of a color neutral Nano-coating claimed to increase transmission while reducing reflections and making them easier to clean. Their other claim to fame is the use of machined brass for their frame. This results in less jamming than filters using aluminum frames.

The filter’s performance was tested by photographing a Macbeth Color Checker using a Canon 5D Mark IV camera fitted with a Canon EF 24-70 mm F- 2.8 LII USM lens set to 50 mm at F/5.6. An initial frame was exposed with no filter on the lens. Then, in turn, both the 3-stop and 6-stop filters were mounted and the exposure time increased by 3 stops in 6 stops accordingly. The resulting images were opened in camera raw in Photoshop CC 2018 and measured in the L*ab color mode using the Eyedropper tool.

For those not familiar with the L*ab color mode, L* is the luminance channel which runs from 0 (Black) to 100 (Luminous White), while the “a” channel is the Green-Magenta axis, and “b” is the Blue-Yellow axis. Both the “a” and “b” run from -128 to + 128 with “0” being neutral. Thus a negative a-channel reading indicates green while a positive a-channel reading indicates magenta. The further away you go from zero towards either extreme indicates a higher degree of color saturation. Similarly, a negative “b” indicates blue, while a positive “b” indicates yellow. So for our purposes here, the ideal filter should have both the “a” and “b” values as close to zero as possible for both the unfiltered and filtered values, while the L* values should match each other as closely as possible. The results show below, for the 6 patches measured, that while the color balance of the tested ND filters did not appear to be totally neutral, it was virtually identical to the unfiltered values. The L values are similarly virtually identical. Thus these two filters perform as precisely claimed providing 3 and 6 stops of attenuation with no significantly measurable or perceptible affect on color balance.

Neutral Density Filter Test Results:

ND Filter Test Results


RGB Visual Comparison:

Comparison of ND Filters

So these filters do indeed appear to function as advertised. And not to be dismissed is their 25 year guarantee, provided that you register them.

Posted in Blog, Photo Topics, Tech Talk | Tagged , , , , | Comments Off on Neutral Density Filter Test

Eclipse 2017- Easley-Greenville, SC

For weeks we were notified by the media that the Easley-Greenville area of South Carolina was going to have the sun totally eclipsed by the moon here on August 21, 2017. So, naturally, I set up to photograph the event. A tripod of course was an absolute necessity, so I set up with a heavy metal Gitzo model equipped with a fluid head. Because the sun was at an approximate 60° elevation that day around 3:00 pm, focusing became impractical through either the Canon’s 5D Mark IV viewfinder or with the live view screen once the camera setup was mounted. Therefore, I used a CamRanger to connect the camera to a tablet. Once that was completed, I could view the camera’s image on the tablet as well as being able to set the shutter speed, aperture, and ISO remotely. A Canon EF 100-400mm f/4.5-5.6L IS II fitted with a Canon 2X lens extender was used to capture the images at 800mm effective focal length. An assistant tracked the progress of the eclipse as I took progressive readings off of some tall pine trees in the background to set an approximate starting exposure. Just before the eclipse totaled, my set exposure was 1/30 sec.at f-16, ISO 400. Surprisingly, this became the exposure I use for my first shot at total, see below:

Eclipse 2017


While the first image of the eclipse was nice enough, I was curious to see if more detail couldn’t be brought out by reducing the exposure. Accordingly, I tried 1/125 & 1/80 sec., finally using the latter to produce my final image, below, after some enhancement in Photoshop CC (2017). If you look carefully at the corona field on the right of the sun, you can see solar flares that were not visible in the first image:

Eclipse 2017, Detailed

You can see a larger version of the eclipse by going to the South Carolina Gallery here.

Posted in Blog, Greenville, Photo Topics, Tech Talk | Tagged , , | 1 Comment

Canon Lens Extender Tests – Upgrade from Version I to Version III?

I have been using my Canon lens extender 1.4X and 2X  for many years. Recently I read some articles that indicated that the version III models were superior to version II. So, naturally I thought that version I extenders must be even further “behind”. Accordingly, version III extenders were ordered  and tests proceeded to verify the improvement in image quality and focus repeatability.

Testing began using FoCal’s Aperture Sharpness Test at a target distance of 11.5 feet. I was not able to detect a significant difference in Quality of Focus results for either the 1.4X or 2 X comparisons at any aperture. Next, I ran their Focus Consistency Test twice for each extender. This test first defocuses the lens, than refocuses the lens on the target for a total of 10 trials and then calculates a quality value. The repeatability turned out to be worse than the differences between the versions:

Focus Consistency Chart


Next I ran some “practical” tests photographing USAF 1951 resolution test targets, one in the center and one near the upper right edge to see if there were any differences between the two multiplier sets. They were all shot at ISO100 at an approximate focus distance of 16’ at a constant aperture of F-11 and 200mm focal length.

Lens Extender Test Image


As can be seen in the 100% crops below, there is no observable difference between the center and edge resolution of the version I and version III 1.4X lens extenders tested. The results for the 2X extender comparison, not shown, are similar—no observable difference in either resolution at 100% magnification, or focus repeatability.

Canon 100 – 400mm F4.5 – 5.6 LII

Test Image - No Lens Extender


Canon 100 – 400mm F4.5 – 5.6 LII + 1.4X

Test Image - 1.4X Lens Extender


Canon 100 – 400mm F4.5 – 5.6 LII +1.4XIII

Test Image - 1.4XIII Lens Extender


Moral of the story, don’t always believe what you read. Instead, rigorously test new gear before accepting. Remember as well that just because something is “new” doesn’t necessarily make it better.

Posted in Blog, Photo Topics, Tech Talk | Tagged , , , , , | Comments Off on Canon Lens Extender Tests – Upgrade from Version I to Version III?

Canon EOS 5D Mark III versus Canon EOS 5D Mark IV

I recently purchased a copy of the 5D Mark IV to replace and supplement my current 5D Mark III. Naturally, when getting a new camera that is said to be better than the older model, a number of questions arise such as, sharpness, noise levels, and dynamic range improvements; as well as possible color balance differences. The last thing you want is a color balance mismatch between the older of the newer models, as one the elements that defines photographic style is how color is handled. With that said, here is a quick summary of what I have found over the course of several weeks of testing:

Image Sharpness: 

For this test, a Canon 180 mm F-3.5 macro lens was mounted on a tripod with a camera to subject distance of approximately 80 inches. The cameras in turn were each attached to the back of the lens and then set to F-7 .1, with a shutter speed of 3.2 seconds under constant artificial light. Focus was done manually in live view at 10 X magnification. The results of USAF 1951 test target, shown below, indicate that for this lens under this test condition, both cameras resolve group 2 pair 4, with perhaps a slight edge to the 5D Mark IV with its image size being reduced by a factor of .857 to match the image size produced by the 5D3. When viewed at 100%, or actual pixels, 5D4 was seen to resolve one pair better, pair 5. That said, it is doubtful that this difference in resolution would be of noticeable significance in a printed image. However, I suspect that the difference between the two cameras would be greater, if a higher resolution lens had been used. The 180 mm F-3 .5 macro is an old lens design, but still in wide use. It was picked so that the lens to target configuration would not be changed when changing cameras.

Resolution Comp - Canon 5D3 vs 5D4

RAW Image Color Balance:

Using the same setup as above, a Macbeth ColorChecker was similarly photographed. When the resultant RAW images from both cameras were converted to TIF files using Photoshop camera raw with the camera calibration camera profile set to the default “Adobe Standard,” there was a distinct difference between the two with the reds and blues appearing noticeably more saturated and brighter. In-camera picture style settings for raw files are not recognized by Adobe camera raw. However, they do have camera profiles that perform a similar function. Some of these are, Camera Faithful, Camera Neutral, Camera Standard, Camera, Landscape, etc. that give a distinctive “look” to the rendered image. In this instance however, it turns out that virtually identical color response can be obtained by setting the in-camera picture style to Neutral in both cameras and setting the camera raw camera profile to Camera Neutral for their TIF processed images. An example of the response for red can be seen below:

Color Comparison


Image Noise:

Although the sensor size of the 5D Mark IV has been increased 36.3% over that of the 5D3, 22.3 to 30.4MP, the increase in image size is only ~16.7% in any one dimension. The issue of concern here is the impact on noise from the necessarily smaller pixel dimensions of the 5D4, 5.36um vs. 6.25um for the 5D Mark III. To test this impact both cameras photographed the same scene at ISO 1250 following the procedure for image sharpness, above, but were underexposed by 5 stops. Then the files were given a 5-stop boost in Adobe camera raw before conversion into TIF files. As can be seen below, the 5D Mark IV image has significantly lower noise. Some of this results from reduction in file size to match the 5D Mark III, but the some also arises from lower noise electronics in the new camera. So, in conclusion, the 5D Mark IV camera has  both improved image quality and larger size in addition to its many new and useful features.

Image noise comparison


Posted in Blog, Photo Topics, Tech Talk | Tagged , , , , | Comments Off on Canon EOS 5D Mark III versus Canon EOS 5D Mark IV